
Game Overview
The German Hanseatic League [Latin: Hansa Teutonica] was a medieval association of merchants in northern Germany. Cities that joined were known as Hanseatic cities — an association loosely organised, never bound by formal contracts, comprising at any one time approximately 200 locations.
You are trying to increase your reputation as a merchant in the Hanseatic era. Establishing trading posts in as many cities as possible is one tactic; building a network of linked cities with tradesmen is another. Improving your merchant abilities can be equally effective.
During your turn you perform 2–5 actions. You can move your traders and merchants on the game map or use them to displace opposing tradesmen. If you manage to occupy all of the connections between two cities, you can set up a trade route and establish a trading post — or, in some cities, develop one of your five abilities instead.
The player who has scored the most prestige points at the end wins.
Components
- 3 Game Boards: The Hanseatic League (front: 4–5 players / back: 3 players), The Eastern Hanseatic League (3–5 players), and Britannia (front: 4–5 players / back: 3 players)
- 135 Traders (wooden cubes, 27 per player colour)
- 20 Merchants (wooden discs, 4 per player colour)
- 5 Writing Desks — Player Boards, one per player colour
- 15 Bonus Markers (3 in gold = start markers, plus 2 blank)
- 9 Mission Cards
- 6 Emperor's Favour tiles
- 1 black wooden cube for the Completed Cities track
- 1 Scorepad
Traders vs. Merchants: In the rules, traders (cubes) and merchants (discs) are referred to collectively as tradesmen. When a rule says "tradesmen" it applies to both. Whenever the distinction matters, the specific terms are used.
The Board
The game board shows cities that are part of the Hanseatic League, each with 1–4 trading post spaces (square spaces for traders, round for merchants) in four privilege colours: white, orange, pink, black.
Connecting the cities are trade routes with 2–4 connection points. Five cities (Groningen, Stade, Lübeck, Göttingen and Halle) have pictograms indicating which ability you can develop when you complete a trade route next to them.
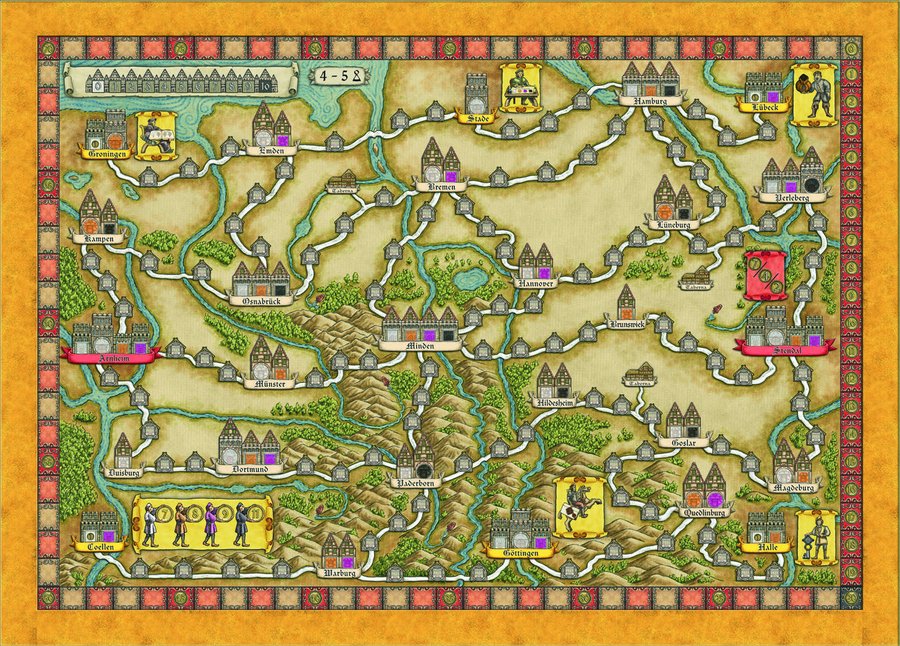
The Hanseatic League game board
Special locations on the board:
- Coellen — opportunity to win special prestige points (7, 8, 9, or 11)
- Stendal & Arnheim (red banners) — the termini of the East-West Connection
- 3 Taverns — the starting positions for the three gold bonus markers
- Prestige Point track — marks each player's score during the game
- Completed Cities track — counts how many cities have had all trading posts filled
Player Board & Abilities
Your writing desk (player board) tracks five abilities that can be developed throughout the game. At the start each ability is at its lowest value. Developing an ability reveals the next level and returns a tradesman to your personal supply.
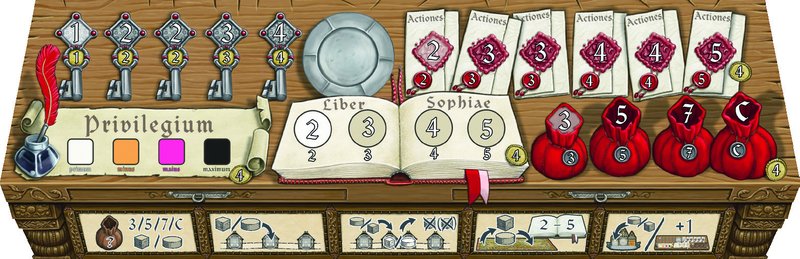
The player writing desk with five ability tracks
The leftmost space of each ability is left empty at setup. The value showing in that space is your starting value. Developing an ability removes the leftmost tradesman from that track and returns it to your personal supply, revealing the next (higher) value.
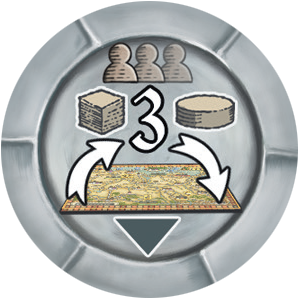
Gaining a higher Actions value (e.g. revealing the 3, 4, or 5) immediately grants you the extra action — even mid-turn, including when triggered by a bonus marker.
Game Setup
- Place the game board of your choice in the centre of the table. (For your first game we recommend The Hanseatic League.)
- Take the 3 gold start bonus markers and randomly place one on each Tavern, arrow pointing to its trade route.
- Shuffle the remaining bonus markers facedown next to the board as a supply.
- Place the black wooden cube on space 0 of the Completed Cities track.
- Each player chooses a colour and takes the matching writing desk and tradesmen.
- On your writing desk, place 3 merchants on the round Book of Knowledge spaces and 15 traders on the square spaces for the other four abilities — leaving the white-shaded leftmost space of each ability empty.
- Place 1 trader on the 0 space of the Prestige Points track.
- Determine a start player. Distribute remaining tradesmen as shown below:
| Player | Personal Supply | General Stock |
|---|---|---|
| Start Player | 5 traders + 1 merchant | 6 traders |
| Player 2 | 6 traders + 1 merchant | 5 traders |
| Player 3 | 7 traders + 1 merchant | 4 traders |
| Player 4 | 8 traders + 1 merchant | 3 traders |
| Player 5 | 9 traders + 1 merchant | 2 traders |
You can only use tradesmen in your personal supply for placing on trade routes. Tradesmen in the general stock must first be moved to your personal supply using Action A (Income).
Your Turn
Players take turns in clockwise order. On your turn you have 5 actions to choose from:
- A Income
- B Place 1 tradesman
- C Displace 1 opponent's tradesman and replace it with 1 of your own
- D Move your tradesmen on the board
- E Create 1 trade route
At the start of the game you may only take 2 actions per turn. By developing the Actions ability you can increase this up to 5 per turn. During your turn, actions can be performed in any order and the same action may be repeated. You must fully complete each action before beginning another. Using a bonus marker does not cost an action.
Actions A–E
Depending on your Bank ability level, hire up to 3, 5, 7, or all of your tradesmen from the general stock into your personal supply.
If fewer tradesmen are available in the general stock than your Bank value allows, you only hire those available. You can only place tradesmen on the board from your personal supply.
Place 1 tradesman from your personal supply on any free connection point on a trade route (one not already occupied by you or an opponent).
It doesn't matter whether other connection points on that route are already occupied. If you repeat this action during your turn you may choose a different connection point for each placement.
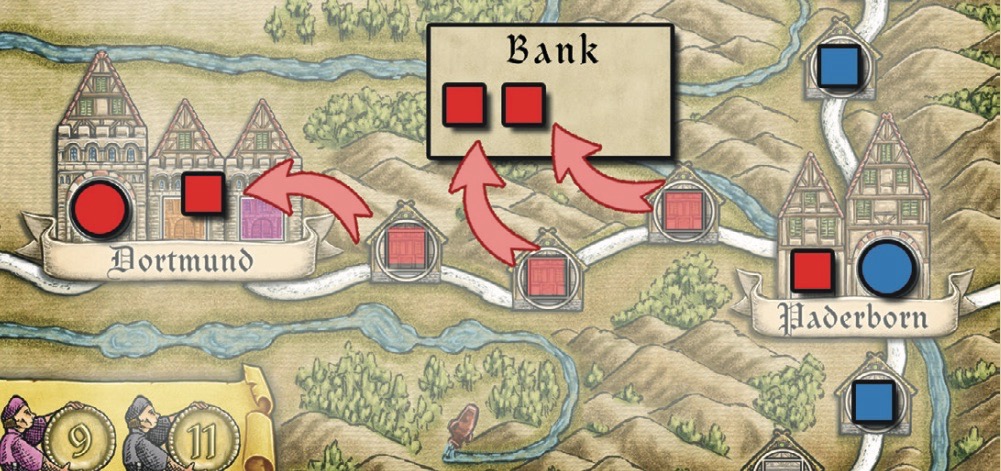
Remove one of your opponents' tradesmen from a connection point on a trade route and replace it with 1 of your own from your personal supply.
- If you displace a trader: pay 1 extra tradesman from your personal supply to the general stock.
- If you displace a merchant: pay 2 extra tradesmen to the general stock.
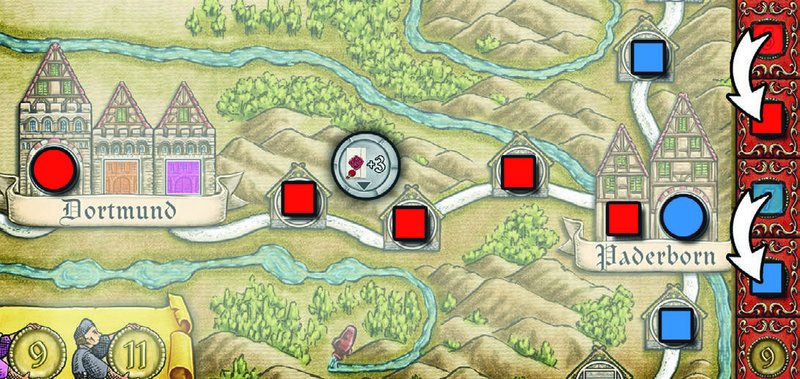
Your opponent must immediately place their displaced tradesman plus the same number of replacement tradesmen from the general stock on free connection points on adjacent trade routes of their choice.
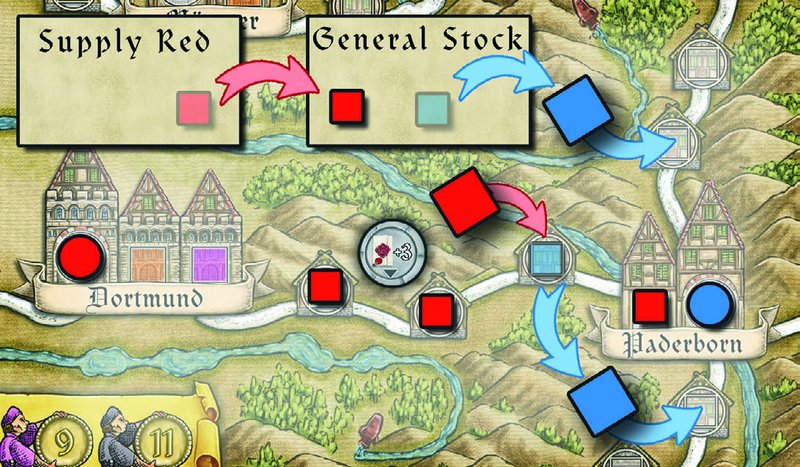
Example: Red displaces Blue's trader between Dortmund and Paderborn
The displaced tradesmen may be spread across 1 or more adjacent trade routes. If all adjacent routes are full, the opponent may use routes further away. If they have no tradesmen in the general stock, they may use their personal supply; if that is also empty, they may use tradesmen already on trade routes — but these must be placed immediately on a route, not returned to the personal supply. An opponent may decline the additional tradesmen from the general stock.
Move 2–5 of your own tradesmen (depending on your Book of Knowledge level) from connection points on trade routes and place them on free connection points on any trade routes.
You may swap a trader and a merchant with 2 moves. You may not displace any opponent's tradesmen during this action.
You may only perform this action if all connection points on a trade route between two cities are occupied by your own tradesmen. Filling the points doesn't create the route automatically — you must explicitly take this action.
When you perform this action, carry out the following steps in order. Steps 1 and 2 must always be done (as far as possible); then you may choose one of three alternatives in step 3:
Step 1 — Score Prestige Points
Check who controls each of the two cities at either end of the trade route. The player with the most trading posts in a city controls it and immediately gains 1 prestige point. (On a tie, the tied player occupying the highest-valued post — furthest right — wins the city.) If one player controls both cities they gain 2 prestige points immediately.
If any player now has 20+ prestige points, the game ends immediately after this action completes.
Red controls Dortmund (1 post); Blue controls Paderborn (higher-valued post wins tie)
Step 2 — Take Bonus Marker
If there is a bonus marker next to this trade route, take it and place it faceup to the left of your writing desk. You may use it once at any time on this or a later turn — using it does not cost an action. After using it, flip it facedown and place it to the right of your desk.
Immediately take 1 new bonus marker from the supply and place it facedown on the silver plate on your writing desk. At the end of your turn you must place this new marker on any trade route observing these restrictions:
- The trade route cannot already have a bonus marker.
- There cannot be any tradesmen on the route.
- At least 1 trading post space must be empty in one of the two adjacent cities.
If the bonus marker supply is empty when you must draw, the game ends immediately after this action — before you can use the bonus marker you just took from the board.
Step 3 — Choose one (or skip)
You may choose exactly one of the following, or skip step 3 entirely (in which case all your tradesmen on the route return to the general stock):
3a — Establish Trading Post. Return all but 1 of your tradesmen from the route to the general stock. Use the remaining 1 to fill the leftmost vacant trading post space in one of the two cities at either end. You cannot skip over a vacant space — you must fill the lowest available one. Traders (cubes) go in square spaces; merchants (discs) go in round spaces. Your Privilege ability must be high enough to fill the colour of the chosen space.
Red establishes a trading post in Dortmund using a trader from the completed route
3b — Develop 1 Ability. If one of the two cities has an ability pictogram, return all tradesmen from the route to the general stock and remove the leftmost tradesman from that ability track on your writing desk, placing it in your personal supply. You now benefit from the higher ability value.
3c — Score Special Prestige Points (Coellen). If you create the trade route between Coellen and Warburg, instead of a trading post you may place a merchant from the route onto one of Coellen's four special prestige point spaces (7, 8, 9, or 11). You may choose any vacant space — skipping is allowed. Your Privilege ability must match the colour of the figure on that space. This merchant stays until end-of-game scoring.
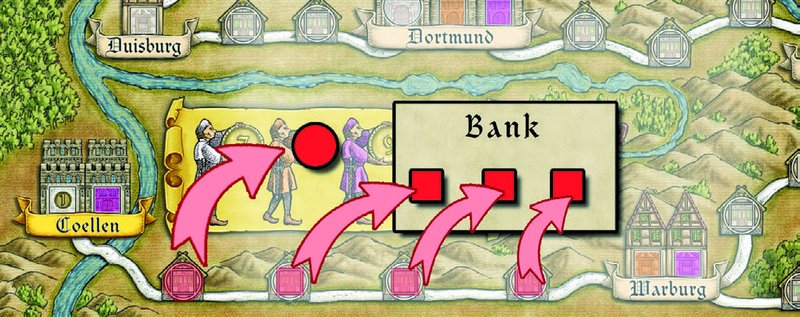
Red places a merchant on Coellen's 8-point space after completing the Coellen–Warburg route
East-West Connection
Immediately after you establish a trading post that creates a continuous chain of your trading posts from Stendal to Arnheim (the red banner cities), you have completed the East-West Connection and gain prestige points:
- 1st player to complete it: 7 prestige points
- 2nd player: 4 prestige points
- 3rd player: 2 prestige points
The length of the route, the privilege colours of your posts, and city control are all irrelevant — only the continuous chain matters.
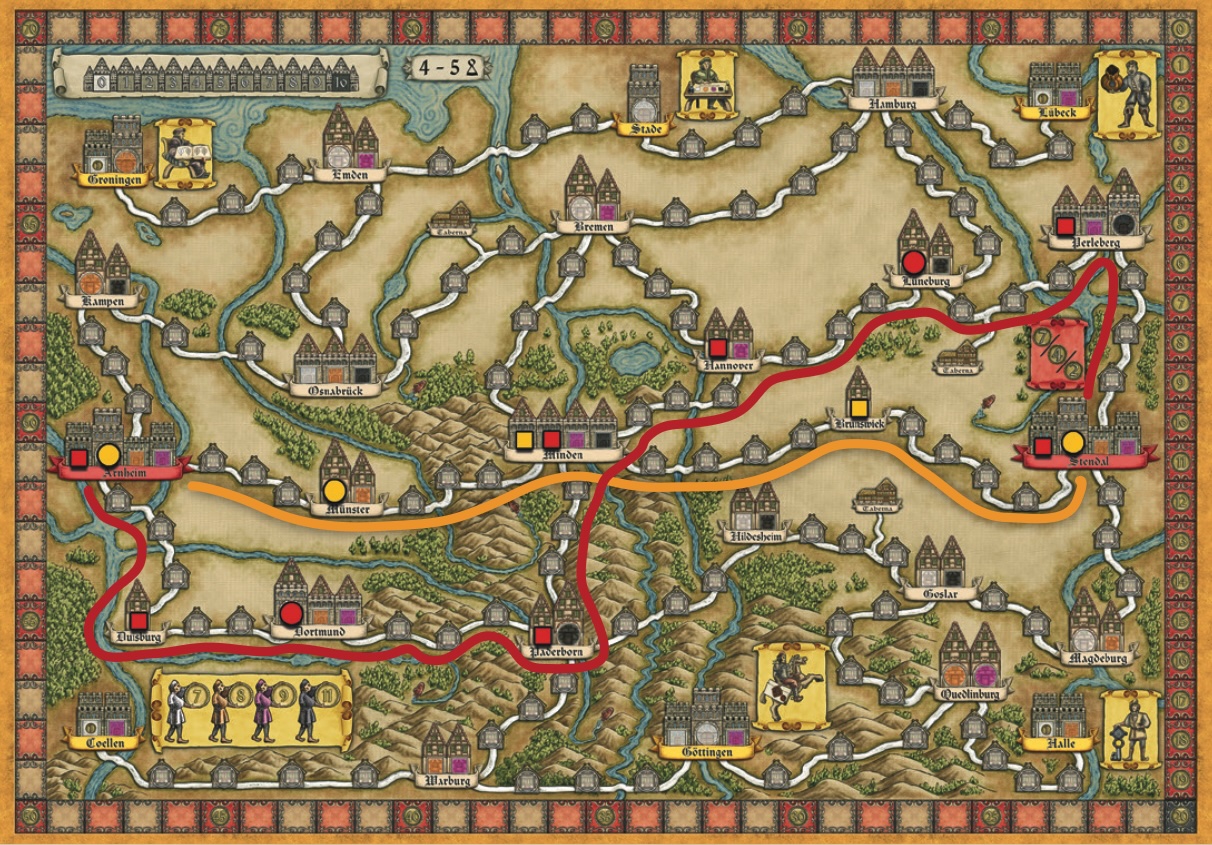
Two possible East-West Connections; yellow shows the shortest
Completing Cities
On the Hanseatic League board, you gain 1 prestige point immediately when you establish the first trading post in certain starred cities (Groningen, Stade, Lübeck, Coellen, Warburg, and Halle on the 3-player side; Groningen, Lübeck, Coellen, and Halle on the 4–5 player side).
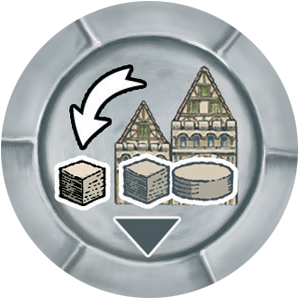
Whenever a city's last vacant trading post space is filled, advance the black cube on the Completed Cities track by 1. If the 10th city is completed, the game ends immediately after that action. No further tradesmen may be placed in a fully completed city (exception: the Additional Trading Post bonus marker).
End of Game
The game ends immediately when any of the following three conditions is triggered during Action E. The active player completes their current action, but all remaining actions are lost and no further turns occur.
- Any player reaches 20 or more prestige points on the track (it doesn't have to be the active player's turn).
- The active player must draw a replacement bonus marker but the supply is exhausted.
- The active player establishes a trading post that completes the 10th city (Completed Cities marker reaches space 10).
Prestige points are gained during the game only through: city control scoring (step 1 of Action E), first-post bonuses on starred cities, and the East-West Connection. All other scoring categories are tallied after the game ends.
Scoring
After the game ends tally all prestige points across six categories. The player with the most points wins. In case of a tie, the tied player who has least developed their Actions ability wins; then most network points; then the tied players share victory.
Bonus Marker Scoring Table
| Bonus Markers Collected | Prestige Points |
|---|---|
| 1 | 1 |
| 2 or 3 | 3 |
| 4 or 5 | 6 |
| 6 or 7 | 10 |
| 8 or 9 | 15 |
| 10 or more | 21 |
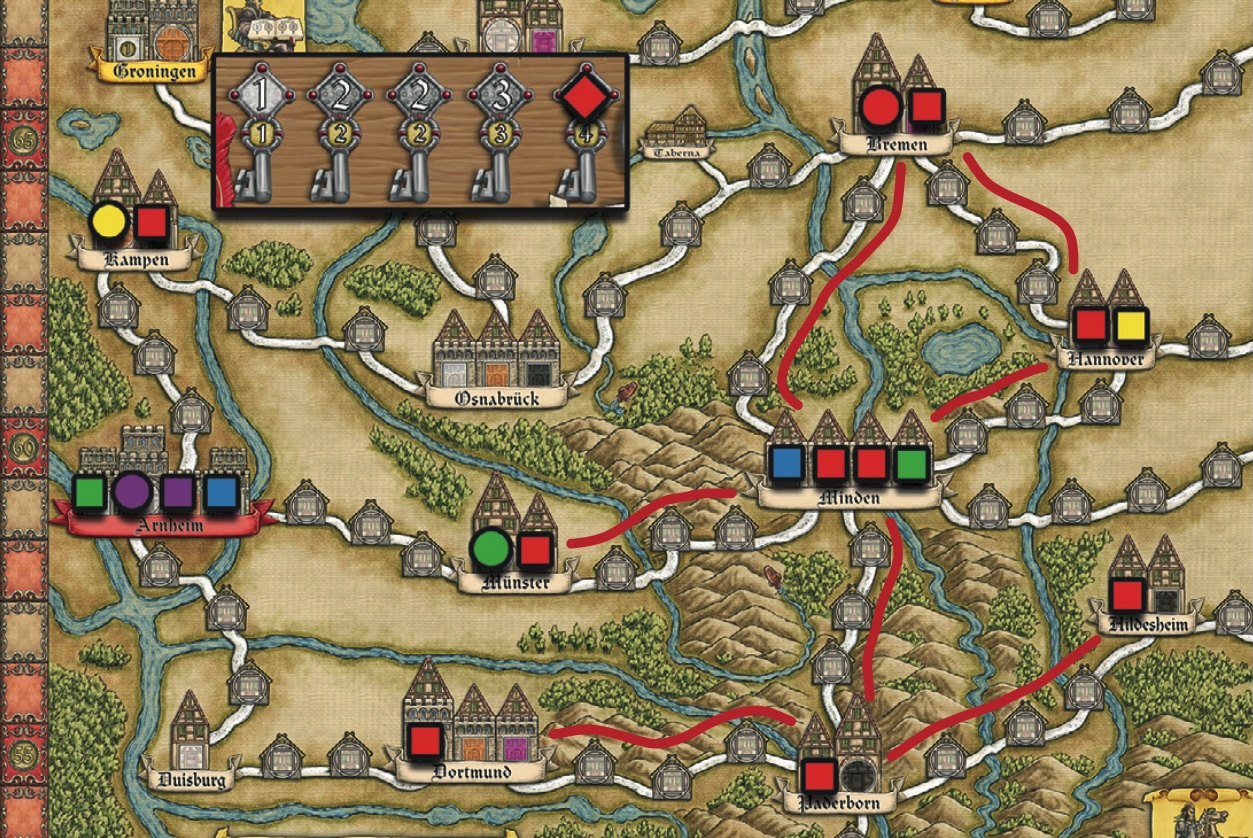
Network end-of-game scoring example: The red player has built a network of 7 cities with a total of 9 trading posts. (The trading post in Kampen is not included because it is not adjacent to any other city in this network.) Because he has developed his City Keys ability to 3, he receives 3 prestige points per trading post in this network for a total of 27 PP.
Bonus Markers
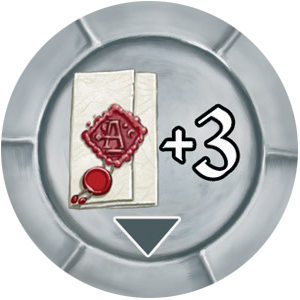
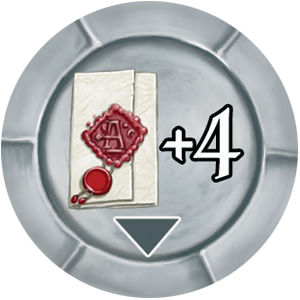
At the start of your turn there are always 3 bonus markers on the board. When you create a trade route with a bonus marker, take it faceup, draw a new one from the supply, and place the new one facedown on your silver plate. At the end of your turn, place all new markers on valid trade routes (not already having a marker, no tradesmen on it, at least 1 open trading post space in an adjacent city). Bonus markers can be used once at any time during your turn (not the same action in which you took it). After use, flip facedown. All markers — used or not — count for scoring.
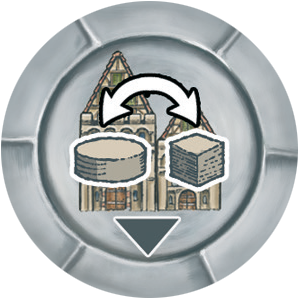

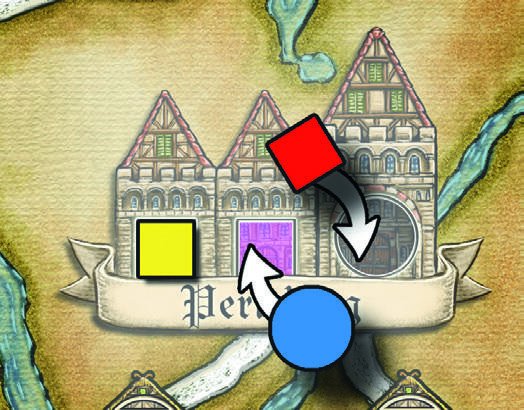
Red uses Exchange Trading Posts to swap with Blue in Perleberg, even without the matching Privilege level
Game design: Andreas Steding · Illustrations: Dennis Lohausen · © 2020, 2024 Pegasus Spiele GmbH. All rights reserved.